This help guide walks
you through the steps required to install an eSIM on an Apple Device, the guide
was created using the most recent version of Apple software available at the
time, IOS 16.3
There are two install
options offered in this help guide, either "install using a QR code"
or "manual install"
Before
starting the install, it is important you
have the following three components:
�
A strong internet connection - Ideally using a Wifi
network or a good 4G connection
�
An eSIM compatible device -
�
The device is not locked to one particular
network - If unsure, an
article has been provided to talk you through how to determine the "locked
/ unlocked" status of a device,
�
Don't forget to turn on "Data Roaming" after install!
Install
Using A QR Code
There are two options
available when scanning the QR code to install an eSIM;
Step
1.
Either
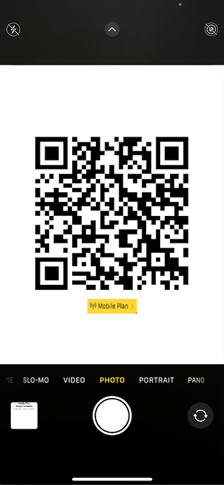
1.1) Open the camera on
your device > Scan the QR code > Tap "Mobile Plan"
Or
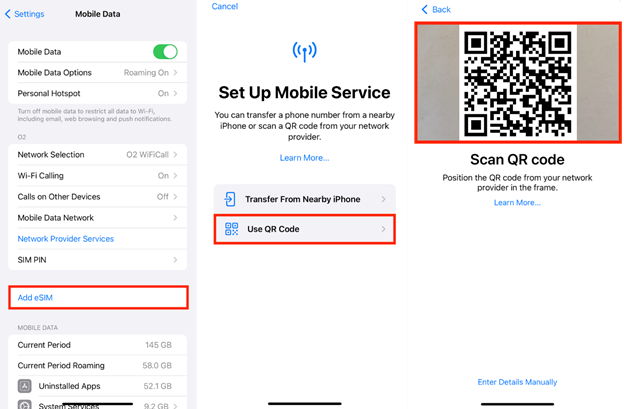
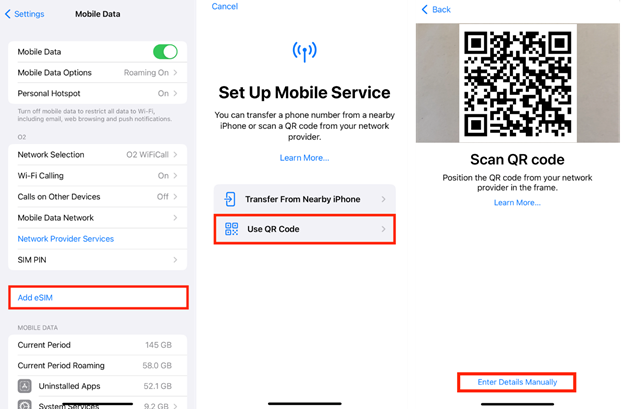
1.2) Go to
"Settings" > Tap "Mobile / Cellular Data" > Tap
"Add eSIM" > Tap "Use QR Code" > Scan the QR code
provided
Step
2. Tap "Continue" >
Allow up to 10 minutes for the eSIM to Activate > Tap "Done"

Step
3. There are two options available at
this stage, we advise proceeding with option 3.1)
Either
3.1) Tap
"Continue" and then move to Step 4.
or
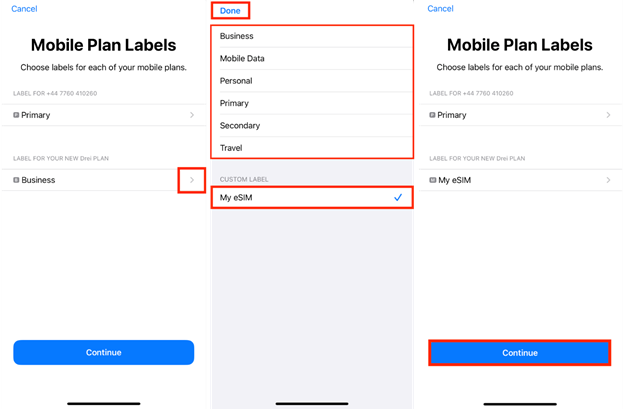
3.2) You have the option
to modify the "eSIM Label" (the name of the eSIM) instead of using
the default name.
If you would like to modify the eSIM label before moving to
the next step;
Tap ">"
(the right hand arrow) > Then either choose one of
the preset label's or type the name you want to use in the
"Custom Label" box > Tap "Done" > Tap
"Continue"
In this example the name
of the esim was changed to "My eSIM" using
the custom label box.
Please
note; Option 3.2) won't be offered to you if
you have more than one eSIM already installed on your device, so a custom label
can only be altered after the SIM install is
complete.
Step
4. Configure the following settings
as suggested:
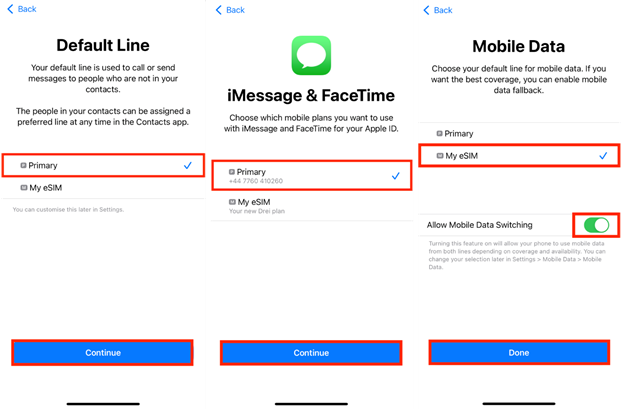
�
Set Default Line to "Primary"
> Tap "Continue"
�
Set iMessage & FaceTime to
"Primary" > Tap "Continue"
�
Set Mobile Data to your previously chosen esim label, in this example "My eSIM"
Allow Mobile Data
Switching is defaulted to off, choose you
preference using the toggle > Tap "Done"
"Allow
Mobile Data Switching" will allow your device to use mobile data from both
lines depending on coverage and availability. You can change your selection
later in settings.
Step
5. The eSIM is now installed and
configured.
Important:
Data Roaming MUST be ENABLED in order for the eSIM to
work
Go to
"Settings" > Tap "Mobile / Cellular Data" > Select
desired SIM > Move the toggle switch to "On"

Don't
forget to turn on "Data Roaming" after install!
Manual
eSIM Install
Step
1. Go to "Settings" >
Tap "Mobile / Cellular Data"
Step
2. Tap "Add eSIM" >
Tap "Use QR Code" > Tap "Enter Details Manually"
Step
3. Enter the "SMDP
Address" and the "Activation Code" provided > Tap "Next"
Leave
"Confirmation Code" blank

Step
4. Tap "Continue" >
Allow up to 10 minutes for the eSIM to Activate > Tap "Done"

Step
5. There are two options available
at this stage, we advise proceeding with option 5.1)
Either
5.1) Tap
"Continue" and then move to Step 6.
or
5.2) You have the option
to modify the "eSIM Label" (the name of the eSIM) instead of using
the default name.
If you would like to modify the eSIM label before moving to
the next step;
Tap ">"
(the right hand arrow) > Then either choose one of
the preset label's or type the name you want to use in the
"Custom Label" box > Tap "Done" > Tap
"Continue"
In this example the name
of the esim was changed to "My eSIM" using
the custom label box.
Please
note; Option 5.2) won't be offered to you if
you have more than one eSIM already installed on your device, so a custom label
can only be altered after the SIM install is
complete.

Step
6. Configure the following settings
as suggested:
�
Set Default Line to "Primary"
> Tap "Continue"
�
Set iMessage & FaceTime to
"Primary" > Tap "Continue"
�
Set Mobile Data to your previously chosen esim label, in this example "My eSIM"
Allow Mobile Data
Switching is defaulted to off, choose you
preference using the toggle > Tap "Done"
"Allow
Mobile Data Switching" will allow your device to use mobile data from both
lines depending on coverage and availability. You can change your selection
later in settings.

Step
7. The eSIM is now installed and
configured.
Important:
Data Roaming MUST be ENABLED in order for the eSIM to
work
Go to
"Settings" > Tap "Mobile / Cellular Data" > Select
desired SIM > Move the toggle switch to "On"
